Smoothie Ice Blenders: 9 Top Picks for 2026
Smoothie ice blenders are essential for creating delicious and refreshing beverages. In this roundup, we highlight the best options available to enhance your blending experience.
Disclosure: As an Amazon Associate I earn from qualifying purchases.
Top Pick: Ninja Professional Blender, Smoothie Blender, Drink Mixer, Grinder, Ice Crusher, Frozen Fruit Blending | Professional 1000 W Power, Total Crushing ™ Technology, XL 72-oz. Pitcher Black, Grey, BL610
- Crushes ice in seconds effortlessly
- Makes smoothies for the whole family
- Cleans easily in the dishwasher

Quick Picks
Ninja Professional Blender – Smoothie & Ice Crusher
- Crushes ice in seconds
- Makes smoothies for the whole family
- Cleans easily in the dishwasher
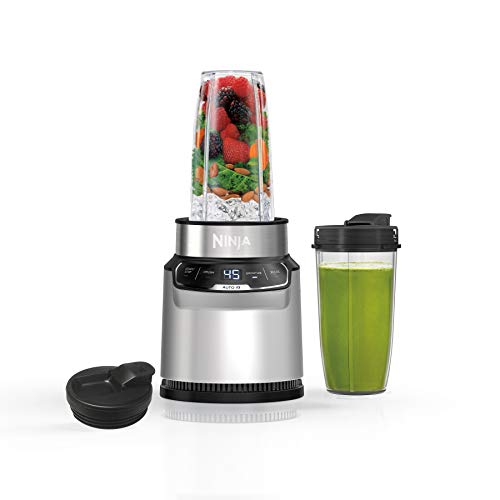
Ninja Nutri Pro Blender
- Crushes ice for creamy drinks
- Extracts nutrients from whole fruits
- Blends directly in portable cup
Ninja 1800W Professional Blender
- Crushes ice for perfect smoothies
- Grinds coffee without flavor transfer
- Cleans itself for hassle-free maintenance

Ninja Professional Plus Blender
- Crushes ice effortlessly for drinks
- Creates smoothies with one button touch
- Cleans easily in the dishwasher

Nahida 1200W Smoothie Blender
- Crushes ice and frozen fruits
- Offers powerful blending with ease
- Includes portable cups for convenience

Ninja Fit Portable Blender
- Unlocks nutrients from whole fruits
- Crushes ice for frozen drinks
- Fits easily on any countertop

Hamilton Beach Wave Action Blender
- Crushes ice effortlessly for smoothies
- Pours mess-free for easy serving
- Cleans easily in dishwasher for convenience

Ninja Professional Plus DUO Blender
- Crushes ice for perfect smoothies
- Creates nutrient-rich drinks effortlessly
- Cleans easily in the dishwasher

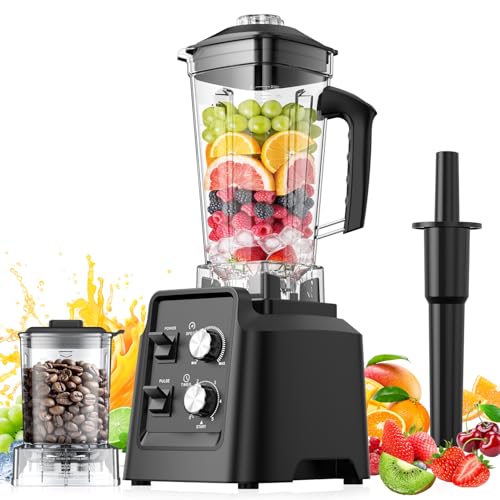
H-Duka Powerful Blender for Smoothies
- Crushes ice and tough ingredients effortlessly
- Adjusts blending speed for perfect textures
- Cleans itself quickly with minimal effort
Top Picks
Ninja Professional Blender, Smoothie Blender, Drink Mixer, Grinder, Ice Crusher, Frozen Fruit Blending | Professional 1000 W Power, Total Crushing ™ Technology, XL 72-oz. Pitcher Black, Grey, BL610
Why it stands out:
- High power for efficient blending
- Large capacity for family-sized servings
- Versatile for various recipes
- Easy to clean and maintain
- Includes recipe guide for inspiration
Overview: The Ninja Professional Blender is a powerful kitchen appliance designed for those who enjoy making smoothies, frozen drinks, and more. With a robust 1000-watt motor and Total Crushing Technology, it can effortlessly blend tough ingredients. Its large 72-ounce pitcher makes it ideal for serving multiple people at once, while easy cleanup features enhance convenience.
Key specs:
| power | 1000 watts |
|---|---|
| capacity | 72 oz |
| technology | Total Crushing Technology |
| material | BPA free |
| cleaning | Dishwasher safe |
| amperage | 12.5 amps |
| color | Black, Grey |
- Smoothie enthusiasts
- Families making large batches
- Individuals who enjoy frozen drinks
- Health-conscious users
- Home cooks looking for versatility
- Those with limited counter space
- Users seeking a compact blender
- Individuals who prefer manual blending
- People on a tight budget
- Those who need a quiet appliance
Why: The blender's robust features make it a top choice for blending tasks.
Why not: It may not be ideal for those with space constraints or a preference for quieter appliances.
- Powerful motor for tough ingredients
- Large pitcher for big servings
- Quick ice crushing capabilities
- User-friendly design
- Includes helpful recipe guide
- Durable and easy to clean
- Bulky and may require ample storage
- Can be noisy during operation
- Not suitable for small servings
- Limited portability
- Price may be higher than basic models
- Requires electrical outlet
Bottom line: The Ninja Professional Blender is an excellent choice for those who prioritize power and capacity in their blending needs. It delivers exceptional performance for a variety of recipes, making it a worthwhile investment for home kitchens.
Ninja | Blender | Nutri Pro | Single Serve | For Smoothies, Salsa, Shakes and Frozen Drinks | Includes 2 Smoothie Cups & Lids | Crushes Ice, Fruit & Veggies |Silver | BN401
Why it stands out:
- Powerful motor for efficient blending.
- Compact design fits easily on countertops.
- Includes convenient single-serve cups.
- Nutrient extraction for enhanced health benefits.
- Two preset programs simplify the blending process.
Overview: The Ninja Nutri Pro Blender is designed for quick and efficient blending, making it ideal for smoothies, salsas, and frozen drinks. With a powerful 1000-peak-watt motor, it can easily handle tough ingredients and ice. Its compact size and single-serve cups provide convenience for on-the-go lifestyles. This blender also features nutrient extraction to maximize the health benefits of your ingredients.
Key specs:
| motor_power | 1000 peak watts |
|---|---|
| cup_size | 24 oz. |
| preset_programs | 2 |
| dimensions | Compact size |
| included_items | 2 smoothie cups & lids |
| blending_features | Crushes ice and frozen ingredients |
| recipe_guide | 20-recipe inspiration guide |
| controls | Intuitive and easy-to-use |
- Health-conscious individuals
- Busy professionals
- Students
- Families looking for quick meal options
- Anyone who enjoys smoothies and frozen drinks
- Those needing a large capacity blender
- People who prefer advanced blending features
- Users looking for a heavy-duty kitchen appliance
- Individuals who blend tough ingredients frequently
- Anyone who requires a multi-functional blender
Why: This blender excels in convenience and efficiency, making it a great choice for quick meals.
Why not: Users needing more blending capacity or advanced features may find this model lacking.
- Efficient blending with a powerful motor
- Easy to use with preset programs
- Compact and portable design
- Includes travel-friendly cups
- Maximizes nutrient extraction
- Quick setup and operation
- Limited capacity for larger batches
- Not suitable for heavy-duty blending tasks
- Fewer advanced features compared to larger models
- May not handle extremely tough ingredients well
- Single-serve design may not suit all users
- Less versatile than full-sized blenders
Bottom line: The Ninja Nutri Pro Blender is an excellent choice for those seeking a compact, powerful, and easy-to-use blending solution. It’s perfect for health-conscious individuals who want quick and nutritious drinks on the go.
Blender, 1800W Blender with Grinder – 6-Blade Professional Smoothie Blenders for Kitchen, Crushes Ice, Self-Cleaning, 68oz & 20oz Jars Dishwasher Safe, for Baby Food, Nut Butter
Why it stands out:
- High peak power motor for fast blending.
- Includes a dedicated grinder jar for versatility.
- Self-cleaning feature saves time on cleanup.
- Multiple speed settings for precise control.
- Large capacity jars for batch preparation.
Overview: The 1800W Blender with Grinder is a powerful kitchen appliance designed for versatility and efficiency. Featuring a 6-blade system, it can effortlessly blend and grind a variety of ingredients, making it ideal for smoothies, nut butters, and more. The self-cleaning function and dishwasher-safe jars enhance convenience, while the precise control settings ensure perfect results for any recipe.
Key specs:
| power | 1800W |
|---|---|
| blade_type | 6-blade stainless steel |
| main_jar_capacity | 68oz |
| grinder_jar_capacity | 20oz |
| self_cleaning | Yes |
| dishwasher_safe | Yes |
| speed_settings | Multiple |
| timer | Built-in |
- Smoothie enthusiasts
- Health-conscious individuals
- Busy parents making baby food
- Home cooks needing versatile appliances
- Coffee lovers grinding beans
- Users with limited kitchen space
- Individuals looking for a budget option
- Those who prefer manual blending methods
- Small households needing minimal capacity
- People who rarely use blenders
Why: This blender offers exceptional performance for a variety of culinary tasks.
Why not: It may not suit those with limited kitchen space or a tight budget.
- Powerful motor for efficient blending
- Versatile with blending and grinding capabilities
- Easy to clean and maintain
- Durable design with thermal protection
- User-friendly with precise control options
- May be too large for small kitchens
- Higher price point compared to basic blenders
- Can be noisy during operation
- Not ideal for single-serving sizes
- Requires counter space for storage
Bottom line: The 1800W Blender with Grinder is a top-tier choice for those seeking a powerful and versatile kitchen tool. It excels in performance and convenience, making it a valuable addition to any culinary setup.
Ninja Professional Plus Blender | Max Power Smoothie Blender, Ice Cream Maker, Frozen Drink Mixer & Margarita Machine | 3 Auto IQ™ Presets, 1400 W, 72oz Total Crushing Pitcher | Dark Grey, BN701
Why it stands out:
- Powerful motor for efficient blending.
- Total Crushing Blades ensure smooth textures.
- Auto-iQ technology eliminates guesswork.
- Large capacity pitcher for family servings.
- Dishwasher safe for easy cleanup.
Overview: The Ninja Professional Plus Blender is designed for those who want to create smoothies, frozen drinks, and ice cream with ease. With a powerful 1400-watt motor and Total Crushing Blades, it can handle tough ingredients and ice effortlessly. Its Auto-iQ technology simplifies the blending process with preset programs, making it user-friendly for all skill levels.
Key specs:
| motor_power | 1400 peak watts |
|---|---|
| pitcher_capacity | 72 oz total, 64 oz max liquid |
| functions | 3 Auto-iQ presets |
| blade_type | Total Crushing Blades |
| material | BPA-free |
| cleaning | Dishwasher safe |
| included_items | Motor base, pitcher, blade assembly, lid, recipe guide |
| color | Dark Grey |
- Families needing large batch preparation.
- Smoothie enthusiasts looking for convenience.
- Home cooks wanting to make frozen desserts.
- Individuals wanting a versatile kitchen appliance.
- Busy people who appreciate one-touch blending.
- Those with limited kitchen space.
- Users who prefer manual control over blending.
- People who blend small quantities frequently.
- Budget-conscious buyers seeking basic blenders.
- Individuals who require a quiet blending experience.
Why: The powerful motor and innovative features make this blender a standout choice for various blending tasks.
Why not: It's not ideal for those who prefer compact or quieter appliances.
- High power for effective blending.
- User-friendly with preset functions.
- Large capacity for multiple servings.
- Easy to clean and maintain.
- Versatile for various recipes.
- May be too large for small kitchens.
- Can be noisy during operation.
- Limited manual blending options.
- Higher price point compared to basic models.
- Requires some counter space.
Bottom line: The Ninja Professional Plus Blender is a powerful and versatile tool perfect for creating a variety of blended drinks. It's best suited for those who prioritize performance and capacity in their kitchen appliances.
Nahida Blender for Smoothies, 1200W Smoothie Blender for Ice Crushing, Blenders with (2) 6-Fin Blades, Personal Blenders for Kitchen with 23oz, 32oz, 37oz Easy Go Cups for Juices, Silver
Why it stands out:
- High-performance motor for quick blending.
- Includes multiple cup sizes for convenience.
- Dual blades for versatile ingredient processing.
- Compact design saves countertop space.
- Safety features to protect the motor and user.
Overview: The Nahida Blender is a powerful 1200W personal blender designed for making smoothies, protein shakes, and more. Its compact size and portable cups make it perfect for on-the-go use, while the dual stainless steel blades ensure efficient blending of tough ingredients. Enhanced safety features and user-friendly design make it a practical choice for anyone looking to create healthy beverages quickly.
Key specs:
| power | 1200W |
|---|---|
| max_speed | 25000 RPM |
| cup_sizes | 23oz, 32oz, 37oz |
| blade_type | 304 stainless steel, 6-fin |
| dimensions | 4.8"W x 7.7"H |
| safety_features | Overheat protection, silicone non-slip feet |
| cleaning | Easy rinse under water |
| recipe_guide | Includes 10 recipes |
- Health-conscious individuals
- Busy professionals
- Fitness enthusiasts
- Students on the go
- Parents making baby food
- Those needing a large capacity blender
- Users who prefer advanced settings
- Individuals who blend very hard ingredients frequently
- People who want a traditional countertop blender
- Those who require a blender for heavy-duty use
Why: This blender is ideal for quick, healthy drinks.
Why not: It may not meet the needs of users requiring larger blending capacities.
- Powerful and fast blending
- Portable and easy to carry
- User-friendly operation
- Compact design for small spaces
- Versatile for various recipes
- Limited capacity for larger batches
- No pulse function available
- Not suitable for heavy-duty blending
- Requires some time to cool after heavy use
- May not handle very hard ingredients well
Bottom line: The Nahida Blender is a versatile and efficient option for those looking to make smoothies and shakes quickly. Its compact design and safety features make it a great fit for personal use or on-the-go lifestyles.
Ninja Fit Compact Personal Blender, Portable Blender for-Smoothies, Shakes, Food Prep, and Frozen Blending, 700-Watt Base, (2) 16-oz. Cups and Spout Lids, Black QB3001SS
Why it stands out:
- Powerful 700-watt motor for effective blending.
- Compact design fits easily on countertops.
- Includes two single-serve cups for convenience.
- BPA-free and dishwasher-safe parts for easy cleaning.
- PULSE technology ensures thorough blending.
Overview: The Ninja Fit Compact Personal Blender is designed for those who want a powerful yet portable blending solution. With a 700-watt motor, it excels at making smoothies, shakes, and frozen drinks. Its compact size makes it perfect for small kitchens or on-the-go lifestyles, while the easy-to-clean design ensures convenience.
Key specs:
| power | 700 watts |
|---|---|
| cup_capacity | 16 oz |
| number_of_cups | 2 |
| material | BPA-free plastic |
| features | Pulse technology, nutrient extraction, frozen blending |
| dimensions | Compact size for easy storage |
| cleaning | Dishwasher safe |
| color | Black |
- Health-conscious individuals
- Busy professionals needing quick meals
- Students in small living spaces
- Fitness enthusiasts making protein shakes
- Families wanting nutritious snacks
- Those needing large batch blending
- People looking for advanced blending features
- Users who prefer glass containers
- Individuals with heavy-duty blending needs
- Those who want a quiet blender
Why: This blender is ideal for quick and nutritious drink preparation.
Why not: It may not meet the needs of users looking for larger capacity or advanced features.
- Compact and portable design
- Easy to use with simple controls
- Versatile for various blending tasks
- Quick cleanup process
- Nutritious blending of whole ingredients
- Limited capacity for larger servings
- Not suitable for heavy-duty blending
- May struggle with very hard ingredients
- Noise level could be higher than expected
- Plastic cups may not appeal to everyone
Bottom line: The Ninja Fit Compact Personal Blender is a great choice for individuals seeking a quick and efficient blending solution. Its compact size and ease of use make it perfect for busy lifestyles.
Hamilton Beach Power Elite Wave Action Blender For Smoothies, 40 Oz Glass Jar, 12 Functions Including Puree, Crush Ice, 700 Watts – Black (58148A)
Why it stands out:
- Powerful 700-watt motor for efficient blending.
- Wave Action system ensures smooth consistency.
- 12 functions for versatile culinary applications.
- Dishwasher-safe parts for easy cleaning.
- Spout design prevents spills during pouring.
Overview: The Hamilton Beach Power Elite Wave Action Blender is designed for versatile blending, featuring a powerful 700-watt motor and a patented Wave Action system that ensures ultra-smooth results. With a 40-ounce glass jar and 12 blending functions, it caters to a variety of culinary needs, from smoothies to purees. Its easy-pour spout and dishwasher-safe components make cleanup and serving hassle-free.
Key specs:
| power | 700 watts |
|---|---|
| jar_capacity | 40 ounces |
| functions | 12 |
| blade_material | stainless steel |
| jar_material | glass |
| dishwasher_safe | yes |
| color | black |
| dimensions | varies |
- Smoothie enthusiasts
- Home cooks seeking versatility
- Families needing a reliable blender
- Individuals making protein shakes
- Those who prefer easy cleanup
- Professional chefs needing high-end blenders
- Users with limited counter space
- Those who require a portable blender
- People looking for advanced features
- Individuals who blend large batches frequently
Why: This blender excels in delivering smooth blends and versatile functionality.
Why not: It may not meet the needs of those requiring advanced blending capabilities.
- Powerful blending performance
- Smooth and consistent results
- Multiple functions for various recipes
- Easy to clean and maintain
- Spill-proof pouring design
- Affordable for home use
- Not suitable for heavy-duty professional use
- Glass jar may be heavy for some users
- Limited portability
- Can be noisy during operation
- May not handle very large batches well
- Basic design without advanced features
Bottom line: The Hamilton Beach Power Elite Wave Action Blender is an excellent choice for everyday blending tasks, offering power and versatility at an accessible price. It's ideal for smoothie lovers and home cooks looking for reliability and ease of use.
Ninja BN751 Professional Plus DUO Blender, 1400 Peak Watts, 3 Auto-IQ Programs for Smoothies, Frozen Drinks & Nutrient Extractions, 72-oz. Total Crushing Pitcher & (2) 24 oz. To-Go Cups, Black
Why it stands out:
- Powerful motor for efficient blending.
- Auto-iQ technology simplifies drink preparation.
- Large capacity pitcher ideal for families.
- Includes convenient to-go cups for portability.
- Dishwasher safe components for easy cleaning.
Overview: The Ninja BN751 Professional Plus DUO Blender is designed for those who love making smoothies and frozen drinks with ease. Featuring a powerful 1400 peak watt motor and Auto-iQ technology, it simplifies the blending process with preset programs. Its large 72-oz pitcher and two 24-oz to-go cups make it convenient for both family use and on-the-go lifestyles.
Key specs:
| motor_power | 1400 peak watts |
|---|---|
| pitcher_capacity | 72 oz |
| to_go_cups | 2 x 24 oz |
| auto_iq_programs | 3 |
| dishwasher_safe | Yes |
| material | BPA-free plastic |
| color | Black |
| recipe_guide | 15 recipes included |
- Smoothie enthusiasts
- Families making large batches
- Health-conscious individuals
- Busy people needing on-the-go options
- Those who appreciate easy cleanup
- Individuals with limited kitchen space
- Those seeking a budget-friendly option
- Users who prefer manual control over blending
- People who only make small servings
- Those who do not need advanced features
Why: This blender combines power and convenience for optimal performance.
Why not: It may not suit those who prefer a compact or budget-friendly option.
- Efficient blending with powerful motor
- User-friendly Auto-iQ programs
- Versatile for various drink types
- Large capacity for family servings
- Convenient portable cups
- Easy to clean components
- Larger footprint may require more counter space
- Higher price point compared to basic blenders
- Limited manual blending options
- May be too powerful for simple tasks
- Not ideal for very small servings
- Requires more storage for accessories
Bottom line: The Ninja BN751 Professional Plus DUO Blender is a robust choice for smoothie lovers and families. Its advanced features and large capacity make it a valuable kitchen appliance.
H-Duka Blender, Countertop Blenders for Kitchen with 64oz Pitcher, Powerful 25000 PRM Blender for Smoothies, Ice Crushing, Frozen Fruits, Milkshakes, Pulse Function, Self-Cleaning (Silver Black)
Why it stands out:
- High-power motor ensures efficient blending.
- Large 64 oz capacity is perfect for families.
- Self-cleaning feature saves time on cleanup.
- Versatile for various recipes and textures.
- User-friendly controls simplify operation.
Overview: The H-Duka Blender is a powerful kitchen appliance designed for creating smoothies, milkshakes, and more with ease. Featuring a robust motor and a large-capacity pitcher, it accommodates family needs and gatherings. Its self-cleaning function and user-friendly design make it a practical choice for everyday use.
Key specs:
| motor_power | 1400W (1800W peak) |
|---|---|
| speed | 25000 RPM |
| pitcher_capacity | 64 oz (1.9 L) |
| blade_type | Stainless steel 6-Edge blades |
| material | BPA-free, odor-free, heat-resistant |
| cleaning_method | Self-cleaning and dishwasher-safe parts |
| control_type | One-touch operation with variable speeds |
| design | Family-oriented with clear measurement markings |
- Families needing large batch preparation.
- Health enthusiasts making smoothies.
- Individuals who enjoy frozen drinks.
- Home cooks creating various textures.
- Busy individuals valuing quick cleanup.
- Those seeking a compact blender.
- Users with limited kitchen space.
- Individuals who prefer manual blending.
- People who rarely make smoothies.
- Budget-conscious consumers.
Why: This blender excels in performance and versatility for diverse culinary needs.
Why not: It may not suit those with space constraints or minimal blending requirements.
- Powerful blending capability.
- Large capacity for multiple servings.
- Easy to clean with self-cleaning feature.
- Versatile for different recipes.
- User-friendly interface.
- Bulky design may not fit all kitchens.
- Higher power consumption.
- May be overkill for occasional users.
- Not ideal for small single servings.
- Limited portability.
Bottom line: The H-Duka Blender is an excellent choice for those who frequently prepare large quantities of blended foods. Its powerful motor and user-friendly features make it a standout option for home kitchens.
How to Choose the Best Smoothie Ice Blender
Selecting the best smoothie ice blender involves several key considerations to ensure you make an informed decision:
- Power: Look for blenders with at least 1000 watts of power to effectively crush ice and blend tough ingredients.
- Capacity: Consider the pitcher size; larger capacities (around 72 oz) are ideal for family servings or batch preparation.
- Blade Design: Blenders with specialized blades, such as those designed for total crushing, can enhance blending efficiency.
- Features: Auto-iQ technology and preset programs can simplify the blending process by automating timing and speed.
- Ease of Cleaning: Opt for blenders with dishwasher-safe components and self-cleaning features for hassle-free maintenance.
Our Testing Methodology for Smoothie Ice Blenders
To determine the best smoothie ice blenders for 2026, we evaluated various models based on performance, user reviews, and expert recommendations. Key factors included:
- Performance Testing: Each blender was tested for ice crushing capability, blending speed, and consistency of smoothies.
- User Feedback: We analyzed customer reviews to gauge satisfaction and identify common issues.
- Feature Comparison: We compared the features of each model, focusing on power, capacity, and ease of use.
- Durability: The materials and build quality were assessed to ensure long-term reliability.
FAQs About Smoothie Ice Blenders: 9 Top Picks for 2026
What should I look for in a smoothie blender?
Consider power, capacity, blade design, features like Auto-iQ, and ease of cleaning.
How much power do I need for a smoothie blender?
A blender with at least 1000 watts is recommended for effective ice crushing and blending.
Are larger pitchers better for blending?
Yes, larger pitchers (around 72 oz) are ideal for making smoothies for families or batch preparations.
What is Auto-iQ technology?
Auto-iQ technology automates blending by controlling timing and speed for optimal results.
How do I clean my blender?
Look for blenders with dishwasher-safe components and self-cleaning features for easy maintenance.
Final Verdict: Best Smoothie Ice Blender for You
After thorough evaluation, the Ninja Professional Blender stands out as the top choice for 2026. With its powerful 1000 watts, total crushing technology, and XL 72-oz pitcher, it excels in creating smooth, delicious smoothies and frozen drinks with ease. For those looking to elevate their blending experience, the Ninja Professional Blender is highly recommended.
Discover Your Perfect Blender
Explore our top picks and find the ideal smoothie ice blender for your needs.